Showing posts with label links. Show all posts

Tuesday, September 29, 2009

Flickr and Photoshop Levels

First, as if I needed another place on the internet to regularly not update, I got a Flickr account: click me. Facebook doesn't seem like a good place to put my good photos, deviantArt doesn't seem like a good place to put non-art photos, and Ravelry isn't a good place for photos not based on yarn, so I needed a good place for all of the above.

I went apple picking with a couple friends last weekend and while there weren't m
any apples, there were lots of trees and a gorgeous blue sky. Photos from this trip made up my first Flickr set are saved in Hillview Farms, including...*
HVF7: Blue skies

Also featured in this set is my newest love: Photoshop's levels feature. I'm thoroughly addicted to manually editing levels--especially the individual RGB channels. Don't get me wrong, I love my Canon PowerShot SD550, but is ultimately is a point-and-shoot with a small lens and small sensor and can use a little tweaking.
HVF1: Apples Progression
Ok, so there was a lot of tweaking. I'm probably overdoing it (just learned today about alt + white/black point to see what might be cut out when adjusting the point), but the colors are so vivid. I don't know how long I've stared at this progression in wonder so far. The first image is after noise reduction, sharpening, and cropping (to straighten it; it still looks crooked to me though), but no levels/contrast/color/etc. adjustments; the second is after applying a levels layer to the whole photo; the third is after applying a levels layer to just the sky, with the ground and trees masked out. Vivid!

Expect many more of these. Eric can only stand to watch me hide and show a levels layer so many times so this obsession needs an out somewhere. Hello, Internet.

* Click on the photos to go to their respective Flickr pages.

Sunday, August 2, 2009

Origami- Contest and Mini Photo Album

Contest
Craft: Origami
Deadline: when the 1500th member joins (they're at about 1350 now)
Prizes include features on dA, dA subscriptions (for premium membership), deviant dollars, and a cell charm
For ALL details (requirements, prizes, etc.) CLICK HERE

To quickly summarize...
  • The theme is Origami, but "You can be as creative as you like to incorporate this theme."
  • You need to be a member of Artisan Craft (how to join), which also means you need to be a member of dA (membership form). Both are completely free to join and don't spam your email.
  • You can submit up to 3 entries.
  • You can use a tutorial so long as you reference it in the deviation description.
  • They're taking experience into account so if you've never done origami before, don't worry--you're not exactly going up against people who have been doing this for years.


My Entry
I found this tutorial for a mini origami photo album shortly before I read about this contest. As soon as I saw it, I knew I had to make it. It was just too good to pass up.

I hadn't done origami in years and even then I was only doing simple stuff and following directions exactly, but I was so excited for this (and rushed since the deadline is "open") that I quickly made a prototype with regular, white paper, dug up an origami kit from years ago, picked out the four designs that least clashed, and came up with an album of my own--all within an hour or two!
Ok so the colors/designs kind of clash, but it's the best I got right now.
Not long after putting this together, I kidnapped the boyfriend for a quick photo shoot. He's been working out, eating right, and just generally losing weight (you can check on his progress here /shameless, un-asked for promotion) which is probably why he was surprisingly quick to agree to a shoot. Doesn't look like he minded...

I cropped and desaturated them a bit, printed them out on nice photo paper, and put them in this order in the album, starting with the red frame and ending with the blue. It made quite a nice no-reason gift for him and now lives on his nightstand. My only regret was that I didn't get a picture of the photos in the frames, but I was too excited to give it to him to wait. It'd probably be a good Photoshop exercise to put them in digitally, but I'll save that for another day.

I'm not "in it to win it"; the contest theme coincided with plans I had already made and the deadline--especially the vagueness of it--gave me the motivation I needed to get it done within a reasonable time period. I know there's much more complicated things even a beginner can do but this is what I wanted to do and the results--though by no means perfect or professional--are quite satisfactory for the circumstances.

If/when I do this again, I'd like better coordinating paper and maybe try to push the corners of the frame back a bit so more of the photo is exposed and the paper doesn't meet at the middle of each side (more like a traditional photo album I guess). Some day. As usual there's so much to do and so little time.

Saturday, July 25, 2009

Über Yarn Pr0n Available Now on Ravelry

[2009.08.05] UPDATE: You can check out the winners here!


Well, yarn pr0n has always been available on Ravelry (click here* to start drooling), but this is just insane. I'm not usually swayed by the yarn page nearly as much as the pages for patterns or finished projects, so to say that I'm glued to the screen is a big deal. What's got me in a tizzie?

It's Sock Summit's Dye for Glory contest! They have a dozen categories with so many beautifully dyed yarns in each. The catch? You can only vote for one in each category. If you're already a Ravelrer go vote now! If you're not but are a knitter, crocheter, dyer, or just yarn appreciator sign up and vote now!

* As of this writing, access to pages within Ravelry is still members only, but it's free to sign up and they really don't spam your email address.

Sunday, April 5, 2009

Back on Task

I started making arm warmer for a friend. I already made a green and purple entrelac scarf for her (ravelry) and had some yarn left over so I thought I'd make arm warmers out of it. This was the second of three entrelac scarves I completed in a row, so I've been pretty entrelacked out lately. I thought a simple stripe pattern loosely based on Knitty's Voodoo would be cool and quick. It was neither.

First, the colors still bother me a bit (they don't even photograph right--all these photos were adjusted to try to get the real life colors). The purple's a bit too blue and the green just doesn't have enough pop to match what I saw in my head (of course in the store it looked perfect ...just like clothes shopping!).

Then there's the fit. That's my left arm modeling the warmer. My friends arm, however, isn't long and lanky. This comes within an inch or so of her elbow (a good place for the glove) meaning they'll be about 8 stripes total. I pictured a lot more. I already ripped it out once to make each stripe two rounds shorter.

Speaking of color-changing in the round...
I got mixed results. The picture pretty much says it all, but allow me to add that this is no reflection on the TECHknitting article I used to learn how to make traveling jogless stripes [for future reference: while looking for the link for this article, I found this one which looks like it would have been a better idea for this project to eliminate the jogs around the purl valleys]. My favorite part: all joins are back joins so I don't have to weave ends in after (Russian joins, while lovely, are also not in my near future after using them exclusively in all three aforementiong entrelac scarves. Yes, I am crazy, why do you ask?).

So as I said, I ripped it out once after a couple stripes, started again and got this far, and then didn't touch it for weeks. I'm trying to be as monogamus as possible to reduce clutter, so this means I didn't knit for weeks. Completely unacceptable. It's now tucked away in a drawer and I have a new arm warmer on the needles. Let's hope this one gets completed (as well as its mate, of course!).

Saturday, December 20, 2008

Nostepindes and Resourcefulness

I'm getting ready for an exciting project (more details later). The person I'm knitting it for wants yarn that's already in my stash, I'm just not sure if I'll have enough. While I wait for her to let me know length, width, etc., I needed to find out how many yards I actually do have on hand.

My desk drawers are mostly opened with knobs, two of which are spaced exactly two feet apart, so I used those to measure out the yarn on the slightly used skeins. Since the knob is at the end of a skinny post, I wrapped a spare shoelace around each until the post was about the same width as the knob so I could wrap the yarn around them and be able to pull it right off when done.

I wrapped the yarn around the knobs 50 times, tied it off into a hank (without actually cutting the yarn, of course), and repeated until done. Then it was just a matter of some simple math to figure out the total yardage: # wraps * 4 ft per wrap / 3 ft in a yd. [I used this same method to figure out how much yarn I need by measuring, then ripping out a swatch and counting the yards used. It ended up being 1 yd per sq. in. of knit fabric--how convenient is that?]

From there, I took the hanks and wound them into balls ...with an empty roll of toliet paper nostepinde! I followed the instructions at http://www.hatchtown.com/nostdir.html. I'm quite pleased with the results; even the first one looks much better than any other ball I've wound:


Friday, October 31, 2008

Happy Halloween!

It's been years since I carved a pumpkin but this year I was so excited for this that I carved two.

Both patterns are from www.pumpkinglow.com. I highly recommend this site--excellent patterns (and they're free!). The only downside is that they're specifically not themed for Halloween.

Now on with the goods!

My panther pumpkin:

A dragon pumpkin I bought and carved on a whim for Eric:
Technically this pumpkin is supposed to be a lot brighter, but once he saw it like this he wouldn't let me punch out the rest of the pieces. I'll admit the whole outline this is pretty cool (and it saved me the trouble of poking out the more complicated pieces around the face).


And photos of them not lit:


Both carvings include scraping the skin (my choice, the patterns weren't actually designed that way). It was my first year scraping and I scraped too much. Everything on Eric's pumpkin that isn't an outline is actually scraped, it's just so thin that it looks about as bright as if I'd just cut through. Doesn't make much of a difference for his anyway since the parts that were supposed to be brighter stayed in the pumpkin for an outline effect anyway.

My panther pumpkin shows off the shading a bit better, but this pumpkin was older and drier after sitting out on the porch for a couple weeks. It was much harder to scrape than the other pumpkin so I ended up poking holes in it while trying to scrape.

Live 'n' learn.

I still love my pumpkins anyway.
...so much so, I was even allowed my picture to be taken while carving one:


Have a safe & happy Halloween!

Tuesday, August 19, 2008

Chocolate Peanut Butter Love

A few weeks ago I discovered a bag of Reese's Peanut Butter Chips at my boyfriend's house. They look just like chocolate chips except they're made with peanut butter. It was love at first bite; they're amazing! As much as I love regular peanut butter from a jar, you can only have so much before your mouth is glued shut. These babies have all the flavor of peanut butter without that inconvenience.

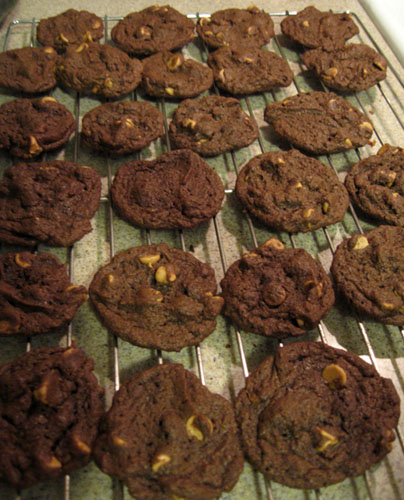
I was eating them by the handful when I saw a picture and recipe on the bag for chocolate peanut butter chip cookies. That's right: chocolate and peanut butter together in a portable cookie. I finally convinced my BF to make them with me this weekend and we were pretty satisfied with the results:


The only downside is that they're a bit too sweet to indulge more than a couple at a time (or maybe that's a good thing?).

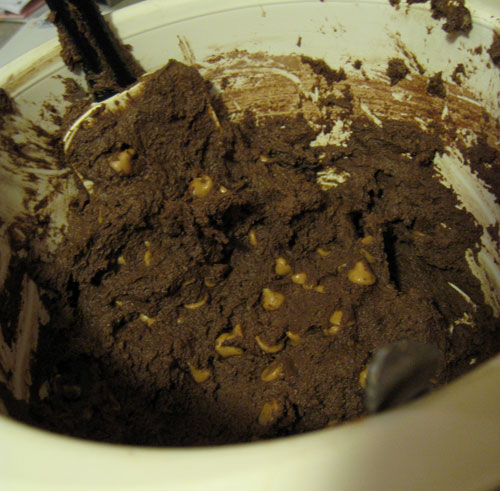
It would be more than worth making them again, though, just for the batter:


Ok so it doesn't look like much in the photo, but trust me it tastes fabulous.

If you want to make the batter yourself (or, you know, the finished product too), the recipe is online: REESE'S Chewy Chocolate Cookies

Monday, August 11, 2008

Sprite Love

No, not the drink...

http://www.spritestitch.com/ - a site for video game inspired crafts! *love*
It has everything from crocheted afghans, to needlepoint controller cases, to even pixel cookies!


Makes me want to get started on a couple ideas I've been tossing around, like a tetris scarf or SMB3-themed hats (though now I have to make pixel cookies, too... those are just too awesome to pass up)...

Monday, June 16, 2008

June 2008 Goals

A bit of a delayed start, but this month I want to...
  • At least get the yarn & needles I'll need for Cherie Amour. I'd love to actually cast on, but that's a bit difficult without all the materials.
  • Knit up another WUA square. This time I really want to try illusion knitting, just a simple star pattern.
  • And if I get the chance, get some more work done on that snowflake/starching tutorial tutorial. Maybe I'll finish it before this year's Christmas =P
I already...
Knit two more WUA squares. One that's the same pattern as another I made (quick, easy, mindless knit). The other was essentially a 7" x 9" gauge swatch for the illusion square to come.